一、前言#
歡迎畫面會是使用者打開 App 時,第一個看到的畫面,畫面顯示的時間長度,會根據 App 啟動的速度而有所不同。
在 Android 11 以前,歡迎畫面通常都是白色,但在 Android 12 以後,系統會使用 App Icon 與 App theme 中設定的 windowBackground 製作 App 的歡迎畫面。
如果我們要客製化 App 的歡迎畫面,該怎麼做呢?
二、常見的幾個老方法#
在看官方推薦的做法前,先來看一下幾個常見的老方法。
以下討論,讓我們先假設 App 的進入點為專案預設的 MainActivity。
2-1 在 MainActivity 前新增一個 SplashScreenActivity#
- 新增一個
SplashScreenActivity。 - 在
SplashScreenActivity 的 UI 中繪製歡迎畫面。 - 使用
Thread.sleep() 設定等待秒數。 - 執行完後跳轉到
MainActivity。
簡單、直覺的一個方法。
設計師要一個歡迎畫面,我就刻一個出來。
搭配 Thread.sleep(),要顯示幾秒就顯示幾秒。
不過,在 SplashScreenActivity 顯示前,使用者還是會看到系統預設的歡迎畫面。
實際進入 App 的使用體驗可能會跟設計師預期的不同,而且有可能等待時間比預期的還要久。
2-2 SplashScreenActivity 搭配 windowBackground#
- 新增一個
SplashScreenActivity。 - 在
/drawable 中新增一個 layer-list 的 splash_backgroun.xml
1
2
3
4
5
6
7
| <?xml version="1.0" encoding="utf-8"?>
<layer-list xmlns:android="http://schemas.android.com/apk/res/android">
<item android:drawable="@color/white" />
<item android:drawable="@drawable/ic_icon_vector"
android:gravity="center"/>
</layer-list>
|
- 在
themes.xml 中新增 SplashScreenTheme。
1
2
3
4
| <!-- Splash Screen theme. -->
<style name="SplashScreenTheme" parent="Theme.AppCompat.NoActionBar">
<item name="android:windowBackground">@drawable/splash_background</item>
</style>
|
- 設定
SplashScreenActivity 的 Theme。
 1
 2
 3
 4
 5
 6
 7
 8
 9
10
11
12
13
14
15
16
17
18
19
| <?xml version="1.0" encoding="utf-8"?>
<manifest xmlns:android="http://schemas.android.com/apk/res/android" package="yourpackage">
<application android:allowBackup="true"
android:icon="@mipmap/ic_launcher"
android:label="@string/app_name"
android:supportsRtl="true"
android:theme="@style/AppTheme">
<activity android:name=".SplashScreenActivity"
android:theme="@style/SplashScreenTheme">
<intent-filter>
<action android:name="android.intent.action.MAIN" />
<category android:name="android.intent.category.LAUNCHER" />
</intent-filter>
</activity>
<activity android:name=".MainActivity" />
</application>
</manifest>
|
SplashScreenActivity 執行完後跳轉到 MainActivity。
1
2
3
4
5
6
7
8
| public class SplashScreenActivity extends AppCompatActivity {
@Override
protected void onCreate(Bundle savedInstanceState) {
super.onCreate(savedInstanceState);
startActivity(new Intent(SplashScreenActivity.this, MainActivity.class));
finish();
}
|
跟前一個方法很類似,不過因為是使用 windowBackground 的設定,使用者不會看到系統的歡迎畫面。
[!Note] 參考資料
三、最佳實踐#
3-1 套件設定#
libs.versions.toml#
1
2
3
4
5
6
7
8
| [versions]
splashScreen = "1.0.0"
# 略...
[libraries]
# Splash Screen
splashscreen = { group = "androidx.core", name = "core-splashscreen", version.ref = "splashScreen"}
|
build.gradle.kts (app)#
1
2
3
4
| dependencies {
// Splash Screen
implementation(libs.splashscreen)
}
|
3-2 無動畫版本#
給 Android 11 以前#
- 建立歡迎畫面的 drawable:
splash_background.xml
 1
 2
 3
 4
 5
 6
 7
 8
 9
10
11
12
13
14
| <?xml version="1.0" encoding="utf-8"?>
<layer-list xmlns:android="http://schemas.android.com/apk/res/android">
<!-- 底色 -->
<item>
<color android:color="@color/yellow_ffc700"/>
</item>
<!-- 畫面中央的圖 -->
<item
android:drawable="@drawable/app_logo"
android:gravity="center"
android:width="@dimen/dp_200"
android:height="@dimen/dp_200">
</item>
</layer-list>
|
如果要調整歡迎畫面中的圖片位置,可以修改 android:gravity 的參數。
- 在
theme.xml 中建立 SplashTheme
1
2
3
4
5
6
| <style name="SplashTheme" parent="Theme.SplashScreen.IconBackground">
<!-- API 30 以前使用 -->
<item name="android:windowBackground">@drawable/splash_background</item>
<!-- 歡迎畫面呈現後載入預設的 App 主題 -->
<item name="postSplashScreenTheme">@style/Theme.AppTheme</item>
</style>
|
- 設定
activity 的 android:theme。
 1
 2
 3
 4
 5
 6
 7
 8
 9
10
| <activity
android:name=".MainActivity"
android:exported="true"
android:theme="@style/SplashTheme">
<intent-filter>
<action android:name="android.intent.action.MAIN" />
<category android:name="android.intent.category.LAUNCHER" />
</intent-filter>
</activity>
|
給 Android 12 (v31) 以後#
Android 12 以後,即便有設定 windowBackground,也會被系統的預設歡迎畫面取代,需要另外設定。
- 建立 v31 版本的
theme.xml 並設定 SplashTheme
 1
 2
 3
 4
 5
 6
 7
 8
 9
10
11
| <?xml version="1.0" encoding="utf-8"?>
<resources>
<style name="SplashTheme" parent="Theme.SplashScreen.IconBackground">
<!-- For API 31 and above. -->
<item name="android:windowSplashScreenBackground">@color/yellow_ffc700</item>
<item name="android:windowSplashScreenAnimatedIcon">@drawable/img_app_logo</item>
<!-- load theme for other pages -->
<item name="postSplashScreenTheme">@style/Theme.Hensreport</item>
</style>
</resources>
|
MainActivity.onCreate() 中呼叫 installSplashScreen()
呼叫的時機點要在 super.onCreate() 與 setContentView() 前。
 1
 2
 3
 4
 5
 6
 7
 8
 9
10
11
12
13
14
15
16
17
18
19
20
| import androidx.core.splashscreen.SplashScreen.Companion.installSplashScreen
class MainActivity : AppCompatActivity() {
private val binding: ActivityMainBinding by lazy {
ActivityMainBinding.inflate(layoutInflater)
}
private var navController: NavController? = null
private val viewModel: MainViewModel by viewModels()
override fun onCreate(savedInstanceState: Bundle?) {
// Handle the splash screen transition.
installSplashScreen()
super.onCreate(savedInstanceState)
setContentView(binding.root)
}
}
|
3-3 Icon 裁切問題#
歡迎畫面 API 要求的 Icon 規格如下,更多細節可以參考 Doc: Splash screen dimensions。
- 帶有背景的 Icon: 大小 240x240dp,圖示必須在直徑 160dp 的範圍內。
- 不帶有背景的 Icon: 大小 288x288dp,圖示必須在直徑 192dp 的範圍內。
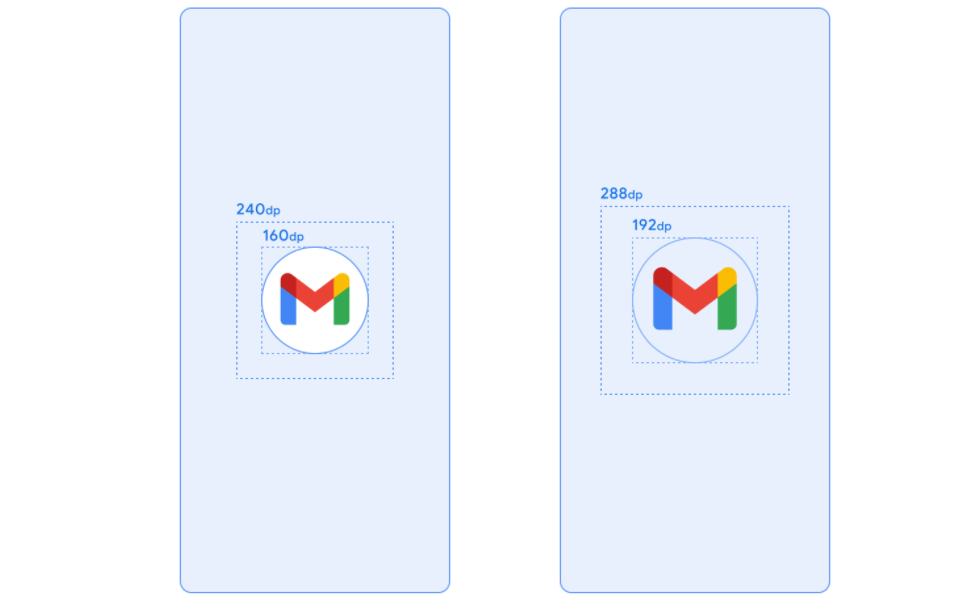
如果沒有特別調整 Icon,放入之後會被系統的圓形遮罩裁切。
而在不調整圖片大小的情況下,可以用以下的方式解決。
以下方式參考自 StackOverflow: New Splash screen is shown cut in a circle shape。
使用 inset tag 建立 inset_logo.xml#
1
2
3
4
5
| <?xml version="1.0" encoding="utf-8"?>
<inset xmlns:android="http://schemas.android.com/apk/res/android"
android:drawable="@drawable/ic_npm_logo_white"
android:inset="@dimen/dp_30">
</inset>
|
將 SplashTheme 裡的 windowSplashScreenAnimatedIcon 替換成 inset_logo#
1
2
3
4
5
6
7
| <style name="SplashTheme" parent="Theme.SplashScreen">
<item name="android:windowSplashScreenBackground">@color/black_121212</item>
<item name="android:windowSplashScreenAnimatedIcon">@drawable/inset_splash_icon</item>
<item name="postSplashScreenTheme">@style/Theme.Npmguide</item>
</style>
|
3-4 動畫版#
跟無動畫版的主要差別在於 windowSplashScreenAnimatedIcon給的圖檔要是animated-vector。其他動畫的細部設定,就看 UI/UX 給的設計稿有沒有特別要求。
 1
 2
 3
 4
 5
 6
 7
 8
 9
10
11
12
13
14
15
16
17
18
19
| <?xml version="1.0" encoding="utf-8"?>
<resources>
<style name="SplashScreen" parent="Theme.SplashScreen.IconBackground">
<!-- 歡迎畫面底色 -->
<item name="android:windowSplashScreenBackground">@color/yellow_ffc700</item>
<!-- 動畫 Icon -->
<item name="android:windowSplashScreenAnimatedIcon">@drawable/avd_play_to_pause</item>
<!-- 動畫 Icon 背景色 -->
<item name="android:windowSplashScreenIconBackgroundColor">@color/blue_007AFF</item>
<!-- 動畫時間 (設定這個值對於實際的動畫時間不會有影響) 但可用於自訂結束動畫的行為 -->
<item name="android:windowSplashScreenAnimationDuration">1000</item>
<!-- 畫面底部商標圖片 -->
<item name="android:windowSplashScreenBrandingImage">@drawable/img_branding</item>
<!-- 歡迎畫面後的 App 主題 -->
<item name="postSplashScreenTheme">@style/Theme.Androidsplashscreen</item>
</style>
</resources>
|
以下提供上面範例裡的 animated-vector:
 1
 2
 3
 4
 5
 6
 7
 8
 9
10
11
12
13
14
15
16
17
18
19
20
21
22
23
24
25
26
27
28
29
| <?xml version="1.0" encoding="utf-8"?>
<animated-vector xmlns:android="http://schemas.android.com/apk/res/android"
xmlns:aapt="http://schemas.android.com/aapt"
xmlns:tools="http://schemas.android.com/tools"
android:drawable="@drawable/ic_pause">
<target android:name="iconGroup">
<aapt:attr name="android:animation">
<set>
<objectAnimator
android:duration="500"
android:interpolator="@android:interpolator/fast_out_slow_in"
android:propertyName="rotation"
android:valueFrom="90"
android:valueTo="180" />
</set>
</aapt:attr>
</target>
<target android:name="iconPath">
<aapt:attr name="android:animation">
<objectAnimator
android:duration="500"
android:interpolator="@android:interpolator/fast_out_slow_in"
android:propertyName="pathData"
android:valueFrom="@string/play_path"
android:valueTo="@string/pause_path"
android:valueType="pathType" />
</aapt:attr>
</target>
</animated-vector>
|
ic_pause.xml
 1
 2
 3
 4
 5
 6
 7
 8
 9
10
11
12
13
14
15
16
17
| <?xml version="1.0" encoding="utf-8"?>
<vector xmlns:android="http://schemas.android.com/apk/res/android"
android:width="120dp"
android:height="120dp"
android:viewportWidth="24.0"
android:viewportHeight="24.0">
<group
android:name="iconGroup"
android:pivotX="12"
android:pivotY="12"
>
<path
android:name="iconPath"
android:fillColor="#FF000000"
android:pathData="@string/pause_path" />
</group>
</vector>
|
strings.xml
1
2
| <string name="pause_path">M10,18 H6 L6,6 L10,6 M14,18 H18 L18,6 L14,6</string>
<string name="play_path">M12,16 H5 L8.5,10.5 L12,5 M12,16 H19 L15.5,10.5 L12,5</string>
|
參考資料#