前言

工作上負責開發維護的一款 App,最近被提了一個新的需求。

客戶希望原有的 開啟 Google Maps 導航 這項功能,能夠除了起訖點外,還能在起訖點間加上停靠點。

原本以為這是件加個經緯度之類的參數,就能完成的事情。閱讀官方文件才發現,目前使用的 Google Maps Intents for Android 並不支援停靠點。

如果要有停靠點,就只能改用支援跨平台的 Maps URLs,且只有路徑規劃,沒有導航。

💡 路徑規劃跟導航差在哪裡?

路徑規劃只會顯示起訖點與各停靠點間的路線。 導航則是會以目前定位直接開啟到目的地的路線指引。

也就是說,路徑規劃比較像是 App 內執行導航的前一個步驟,使用者必須自己按下開始導航。

什麼是 Maps URLs

Maps URLs 是用來開啟 Google Maps App/Web 的跨平台 URL。這裡的跨平台包含 Android、 iOS 、 Web ,三大平台都可以支援。

目前已支援開啟的 App 功能有:

  1. Search 搜尋
  2. Directions 路徑規劃
  3. Display a Map 顯示地圖
  4. Display a Street View panorama 街景服務

今天這篇文章只會提到第二個的路徑規劃,其他三種功能我之後會再另開文章補上~

路徑規劃

顧名思義,就是開啟 Google Maps 的路徑規劃功能。 呼叫之後會在 Google Maps 上開啟點到點之間的路徑,並顯示距離和時間。

路徑規劃示意圖路徑規劃示意圖 (使用定位作為起點)導航示意圖

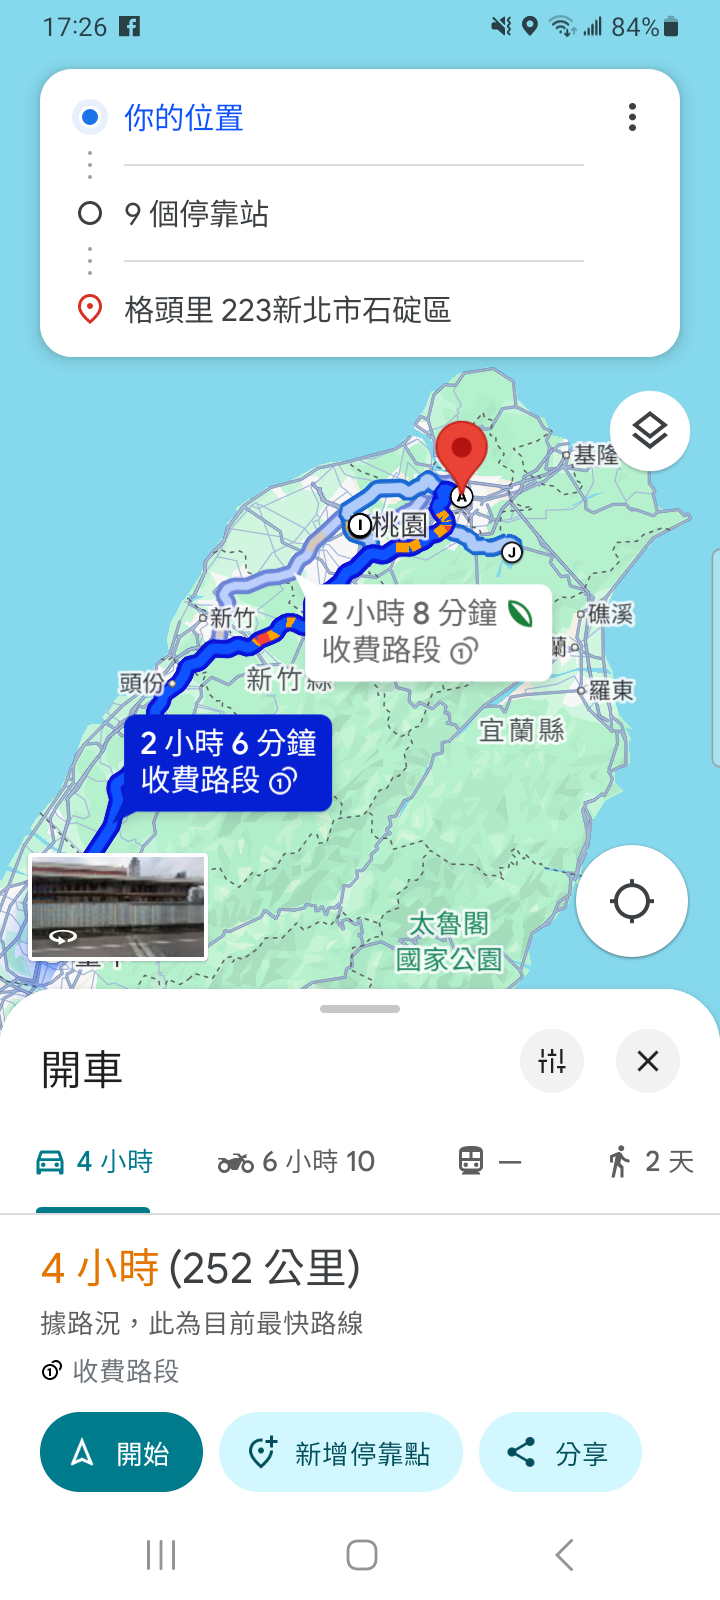
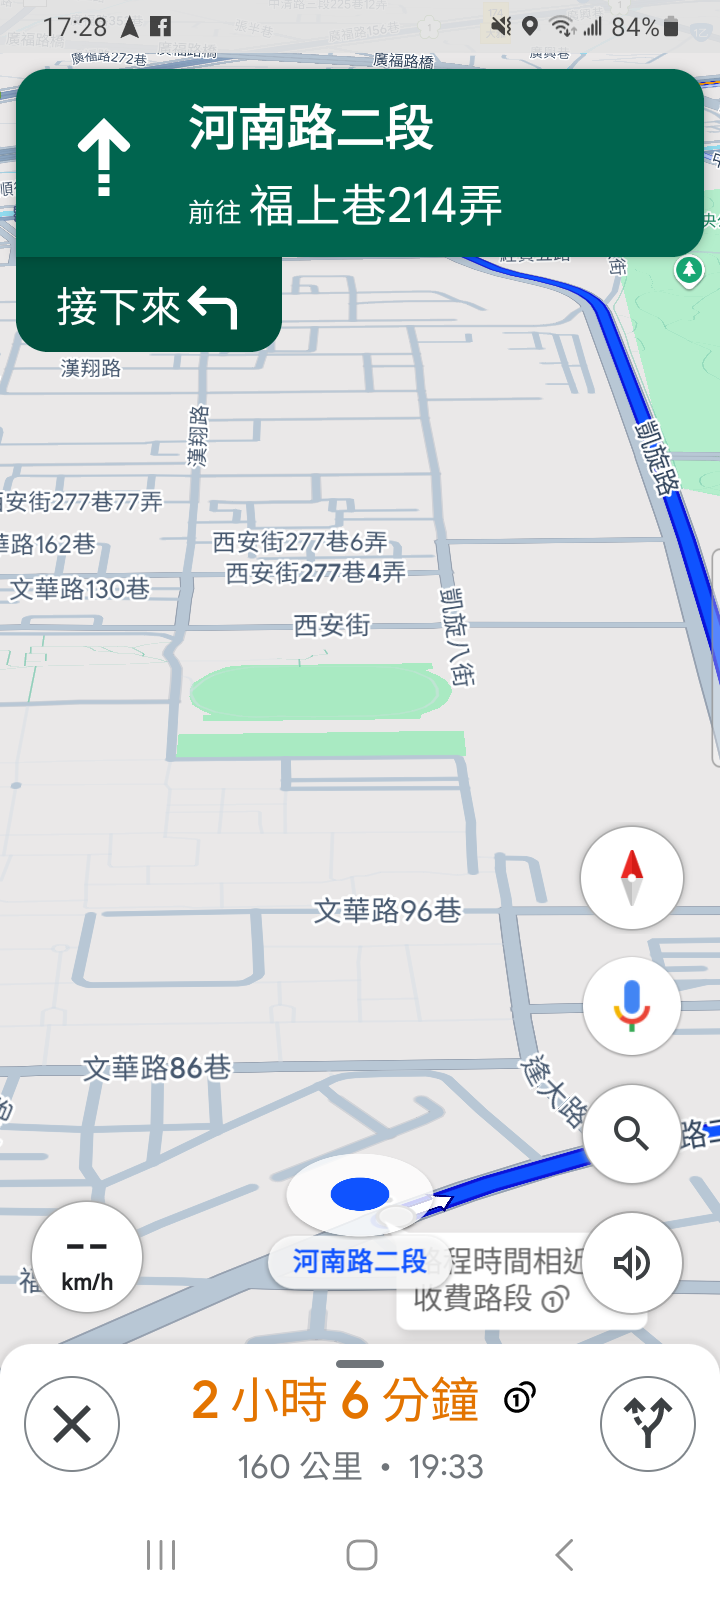
以上面三張圖來說,左側與中間的圖是路徑規劃,右側的圖是導航功能。

廢話不多說,就來看看怎麼實作吧!

URL 格式

路徑規劃的 baseUrl:https://www.google.com/maps/dir/?

參數

參數名稱說明必填範例
api=1固定參數,表示使用 Google Maps URLs API
origin起點 ( 地名、地址、緯度,經度 )須要使用 URL-encoded
destination終點 ( 地名、地址、緯度,經度 )須要使用 URL-encoded
travelmode導航模式 (沒寫會使用 App 的設定)
waypoints停靠點(使用 | 分隔,接受格式同 origindestination
avoid路徑規劃須避免的道路類型,可多選。須使用 , 分隔。
origin_place_id使用 Place ID 標記起點
destination_place_id使用 Place ID 標記終點
waypoint_place_ids使用 Place ID 標記停靠點
dir_action路徑規劃頁的行為

乍看之下,參數似乎很多,但如果沒有要太多的客製化,只要關注在 origindestinationwaypoints 這三個參數就可以了。

🚨 停靠點的限制

網頁版最多 3 個。

App ( iOS & Android) 最多 9 個。

另外,不是所有 Google Maps 的產品都有支援。(文件內沒有細講有哪些產品。)

如果想要設定路徑的其他條件,可以參考下面所列的參數,個別補上。

  • 導航模式:
    • driving 開車
    • walking 走路
    • bicycling 腳踏車
    • two-wheeler 兩輪 (機車類的)
    • transit 大眾運輸
  • URL-encoded 對照
    • | 👉 %7C
    • , 👉 %2C
  • avoid 類型
    • ferry
    • highways
    • tolls
  • origin_place_iddesitination_place_idwaypoint_place_ids
    • Place ID 可以更精準的定位到指定的位置。
    • 這幾個參數只是輔助,原本的起點、終點、停靠點的參數還是要帶。

範例

因為 Maps URLs 支援跨平台,所以這些範例連結都可以在電腦或手機瀏覽器上直接開啟。

  1. 單純開啟路徑頁
  2. 起訖點開車的路徑規劃
  3. 起訖點間包含兩個停靠點的路徑規劃

在 Android 上呼叫

程式沒有很複雜,基本概念就是將參數依格式組好,轉成 Uri 後透過 Intent.ACTION_VIEW 丟給 Google Maps App 處理。

 1
 2
 3
 4
 5
 6
 7
 8
 9
10
11
12
13
14
15
16
17
18
19
20
21
22
23
24
25
26
27
28
29
30
31
32
33
34
35
36
37
38
39
40
41
42
43
44
45
46
47
48
49
50
51
52
53
54
55
56
57
58
59
60
61
62
63
64
65
66
67
68
69
70
71
72
73
74
package tw.dh46.ithome23.sample.intent  
  
import android.content.Context  
import android.content.Intent  
import android.net.Uri  
import com.google.android.gms.maps.model.LatLng  
  
/**  
 *  Created by danielhuang on 2025/2/7
 * */
object GoogleMapsIntentHelper {  
  
    private val baseUrl = "https://www.google.com/maps/dir/?"  
  
    /**  
     * 開啟路徑規劃  
     *  
     * @param context  
     * @param origin 起點  
     * @param destination 終點  
     * @param waypoints 停靠點 (最多 9 個)  
     * @param travelMode  
     */  
    fun startNavDirection(  
        context: Context,  
        origin: LatLng,  
        destination: LatLng,  
        waypoints: List<LatLng>? = null,  
        travelMode: TravelMode = TravelMode.DRIVE  
    ) {  
        // 固定參數  
        val apiType = "api=1"  
        val originStr = "&origin=${origin.latitude},${origin.longitude}"  
        val destinationStr =
	        "&destination=${destination.latitude},${destination.longitude}"  
        val travelMode = "&travelmode=${travelMode.value}"  
  
        // 轉換停靠點成字串格式  
        val waypointsStr =  waypoints.toWaypointsStr()  
  
        // 建立完整的導航 URL        
        val navigationUrl =
	        "$baseUrl$apiType$originStr$destinationStr$travelMode$waypointsStr"  
  
        // 建立 Intent 並開啟 Google Maps        
        val intent = Intent(Intent.ACTION_VIEW, Uri.parse(navigationUrl))
        .apply {  
            setPackage("com.google.android.apps.maps") 
            // 確保使用 Google Maps App        
        }  
  
        if (intent.resolveActivity(context.packageManager) != null) {  
            context.startActivity(intent)  
        } else {  
            throw Error("Google Maps 未安裝")  
        }  
    }  
  
    private fun List<LatLng>?.toWaypointsStr(): String {  
        if (isNullOrEmpty()) return ""  
        val points = subList(0, 9).joinToString("|") { 
	        "${it.latitude},${it.longitude}" 
        }  
        return "&waypoints=$points"  
    }  
  
    enum class TravelMode(val value: String) {  
        DRIVE("drive"),  
        WALKING("walking"),  
        BICYCLING("bicycling"),  
        TRANSIT("transit"),  
        TWO_WHEELER("two-wheeler")  
    }  
}

結語

以上就是使用 Maps URLs 開啟路徑規劃功能的介紹,有任何問題歡迎下面留言討論~ 👋